TDM2506 RA4M1 Mini
Tổng quan
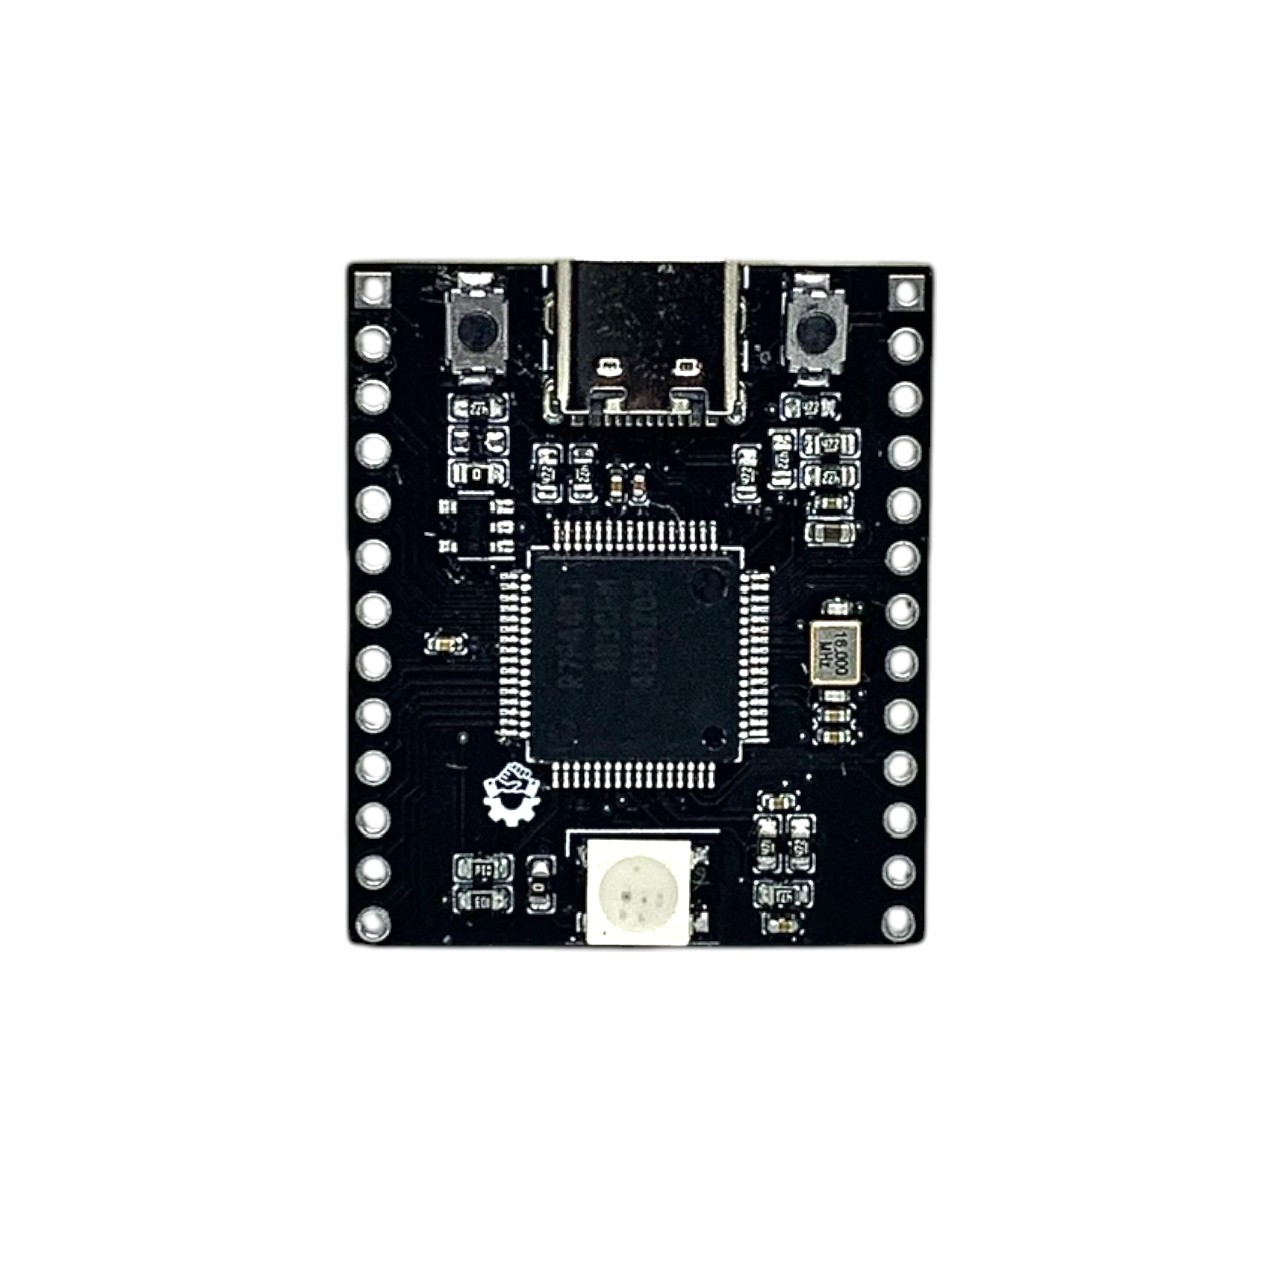
RA4M1 Mini tương thích phần mềm với Arduino Uno R4 Minima Development Kit là một board phát triển vi điều khiển nhỏ gọn với nhiều giao diện kỹ thuật số. Về phần cứng, nó sử dụng chip R7FA4M1AB3CFM, được trang bị vi xử lý 32-bit Cortex-M4® đơn nhân, có đơn vị tính toán dấu chấm động (FPU), hỗ trợ tần số xung nhịp lên đến 48MHz. Bộ nhớ tích hợp gồm 256KB ROM, 32KB SRAM và 8KB EEPROM, giúp tăng khả năng tương thích với nhiều ngoại vi khác nhau, hỗ trợ linh hoạt cho các ứng dụng.
Về phần mềm, bạn có thể sử dụng Arduino IDE để lập trình, giúp việc phát triển và ứng dụng nhanh chóng, dễ dàng.
Sử dụng chung source với Arduino Uno R4 Minima giúp dễ dàng phát triển các ứng dụng trên arduino.
|
|
 |
Tính năng nổi bật
-
Vi điều khiển Renesas RA4M1 dựa trên kiến trúc ARM Cortex-M4, tốc độ hoạt động 48MHz, tích hợp FPU.
-
Bộ nhớ: 256KB flash, 32KB SRAM, 8KB EEPROM.
-
Ngoại vi: ADC 14-bit, DAC 12-bit, bộ điều khiển CAN, giao diện USB 2.0, LED RGB tích hợp.
-
Bảo mật: Hỗ trợ mã hóa firmware, khởi động an toàn, chống giả mạo, đảm bảo an toàn cho dữ liệu và hệ thống.
-
Tương thích cao, hỗ trợ nhiều giao diện ngoại vi, mở rộng linh hoạt.
-
Thiết kế mô-đun castellated, cho phép hàn trực tiếp vào board mạch chủ.
-
Hỗ trợ Arduino IDE, giúp người dùng phát triển nhanh chóng và thuận tiện hơn.
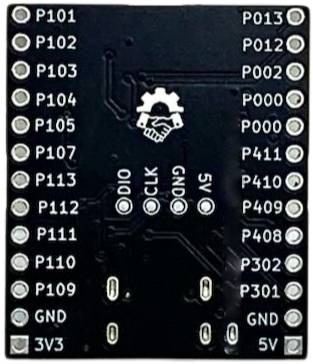
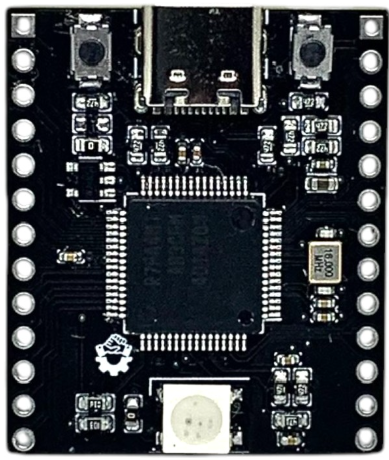
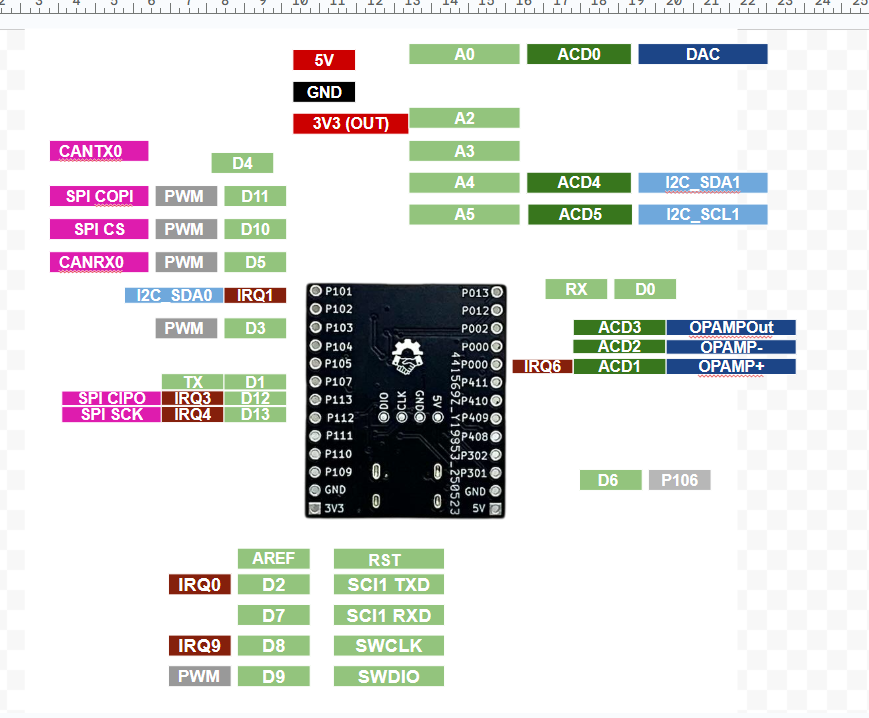
Sơ đồ chân

- Renesas R7FA4M1AB3CFM
Bộ xử lý FPU tích hợp, tần số hoạt động tối đa 48MHz
- ME6217C33M5G
LDO (bộ điều chỉnh điện áp thấp), dòng điện tối đa 800mA
- Nút BOOT
Nhấn nút này khi reset để vào chế độ tải Bootloader
- Cổng USB Type-C
Dùng để tải chương trình, hỗ trợ máy chủ và thiết bị USB1.1
- Nút RESET
-
LED RGB WS2812
Điều khiển qua chân GPIO D6 của MCU
Mạch sau em đang tra datasheet @@@@@@@@@@@@@~

Kích thước mạch
Hướng dẫn set up và lập trình trên Arduino IDE
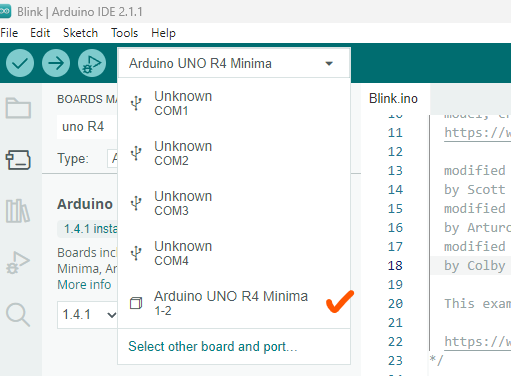
Bạn tiến hình cài đặt và set up flash firmware theo link bài hướng dẫn ở cuối trang trước khi nạp code qua Arduino IDE.
Sau khi hoàn tất quá trình flash firmware giao diện arduino IDE sẽ hiện như vầy.
Bạn tiến hành nạp lần đầu với chương trình hello world đơn giản với code mẫu.
void setup() {
  // Initialize serial communication at 115200 baud rate
  Serial.begin(115200);

  // Wait for serial port to connect (needed for some Arduino boards)
  while (!Serial) {
    ; // Wait for serial port to connect
  }
}

void loop() {
  // Print "Hello, World!" to the Serial Monitor
  Serial.println("Hello, World!");

  // Wait for 1 second (1000 milliseconds)
  delay(1000);
}
Sau khi nạp lần đầu port của mạch sẽ xuất hiện đây là kết quả hiển thị trên Arduino IDE.
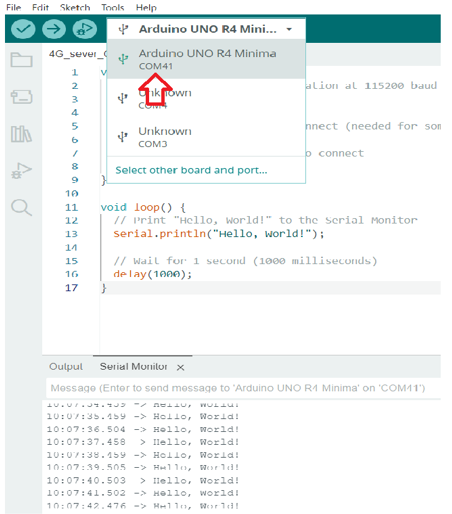
Chương trình đã chạy thành công và COM của board đã hiển thị trên màn hình những lần sau bạn chỉ cần chọn đúng com và nạp code.
Code mẫu điều khiển led RGB
Dưới đây là code mẫu điều khiển led RGB trên mạch dùng chân 6 của mạch.
#include <Adafruit_NeoPixel.h>

// Define the data pin and number of LEDs
#define DATA_PIN 6    // P106 (Pin 6 on Arduino R4)
#define NUM_LEDS 1    // One LED

// Create NeoPixel object
Adafruit_NeoPixel strip = Adafruit_NeoPixel(NUM_LEDS, DATA_PIN, NEO_GRB + NEO_KHZ800);

void setup() {
  // Initialize the NeoPixel strip
  strip.begin();
  strip.setBrightness(50); // Set brightness (0-255, 50 is ~20% to avoid overheating)
  strip.show(); // Initialize all pixels to 'off'

  // Initialize serial communication for debugging (optional)
  Serial.begin(115200);
  while (!Serial) {
    ; // Wait for serial port to connect
  }
  Serial.println("Addressable RGB LED Control Started");
}

void loop() {
  // Red
  setRGB(255, 0, 0); // Full Red, no Green, no Blue
  Serial.println("Red");
  delay(1000);

  // Green
  setRGB(0, 255, 0); // No Red, full Green, no Blue
  Serial.println("Green");
  delay(1000);

  // Blue
  setRGB(0, 0, 255); // No Red, no Green, full Blue
  Serial.println("Blue");
  delay(1000);

  // White
  setRGB(255, 255, 255); // Full Red, Green, Blue
  Serial.println("White");
  delay(1000);

  // Purple
  setRGB(255, 0, 255); // Full Red, no Green, full Blue
  Serial.println("Purple");
  delay(1000);

  // Off
  setRGB(0, 0, 0); // No Red, no Green, no Blue
  Serial.println("Off");
  delay(1000);
}

// Function to set RGB LED color
void setRGB(uint8_t red, uint8_t green, uint8_t blue) {
  strip.setPixelColor(0, strip.Color(red, green, blue)); // Set color for the first (and only) LED
  strip.show(); // Update the LED
}
Tài nguyên:
-
- Schematic
- 3D model
- Tài liệu tham khảo từ Arduino
Xem thêm:
Hướng dẫn Flash Firmware Bootloader Arduino cho chip